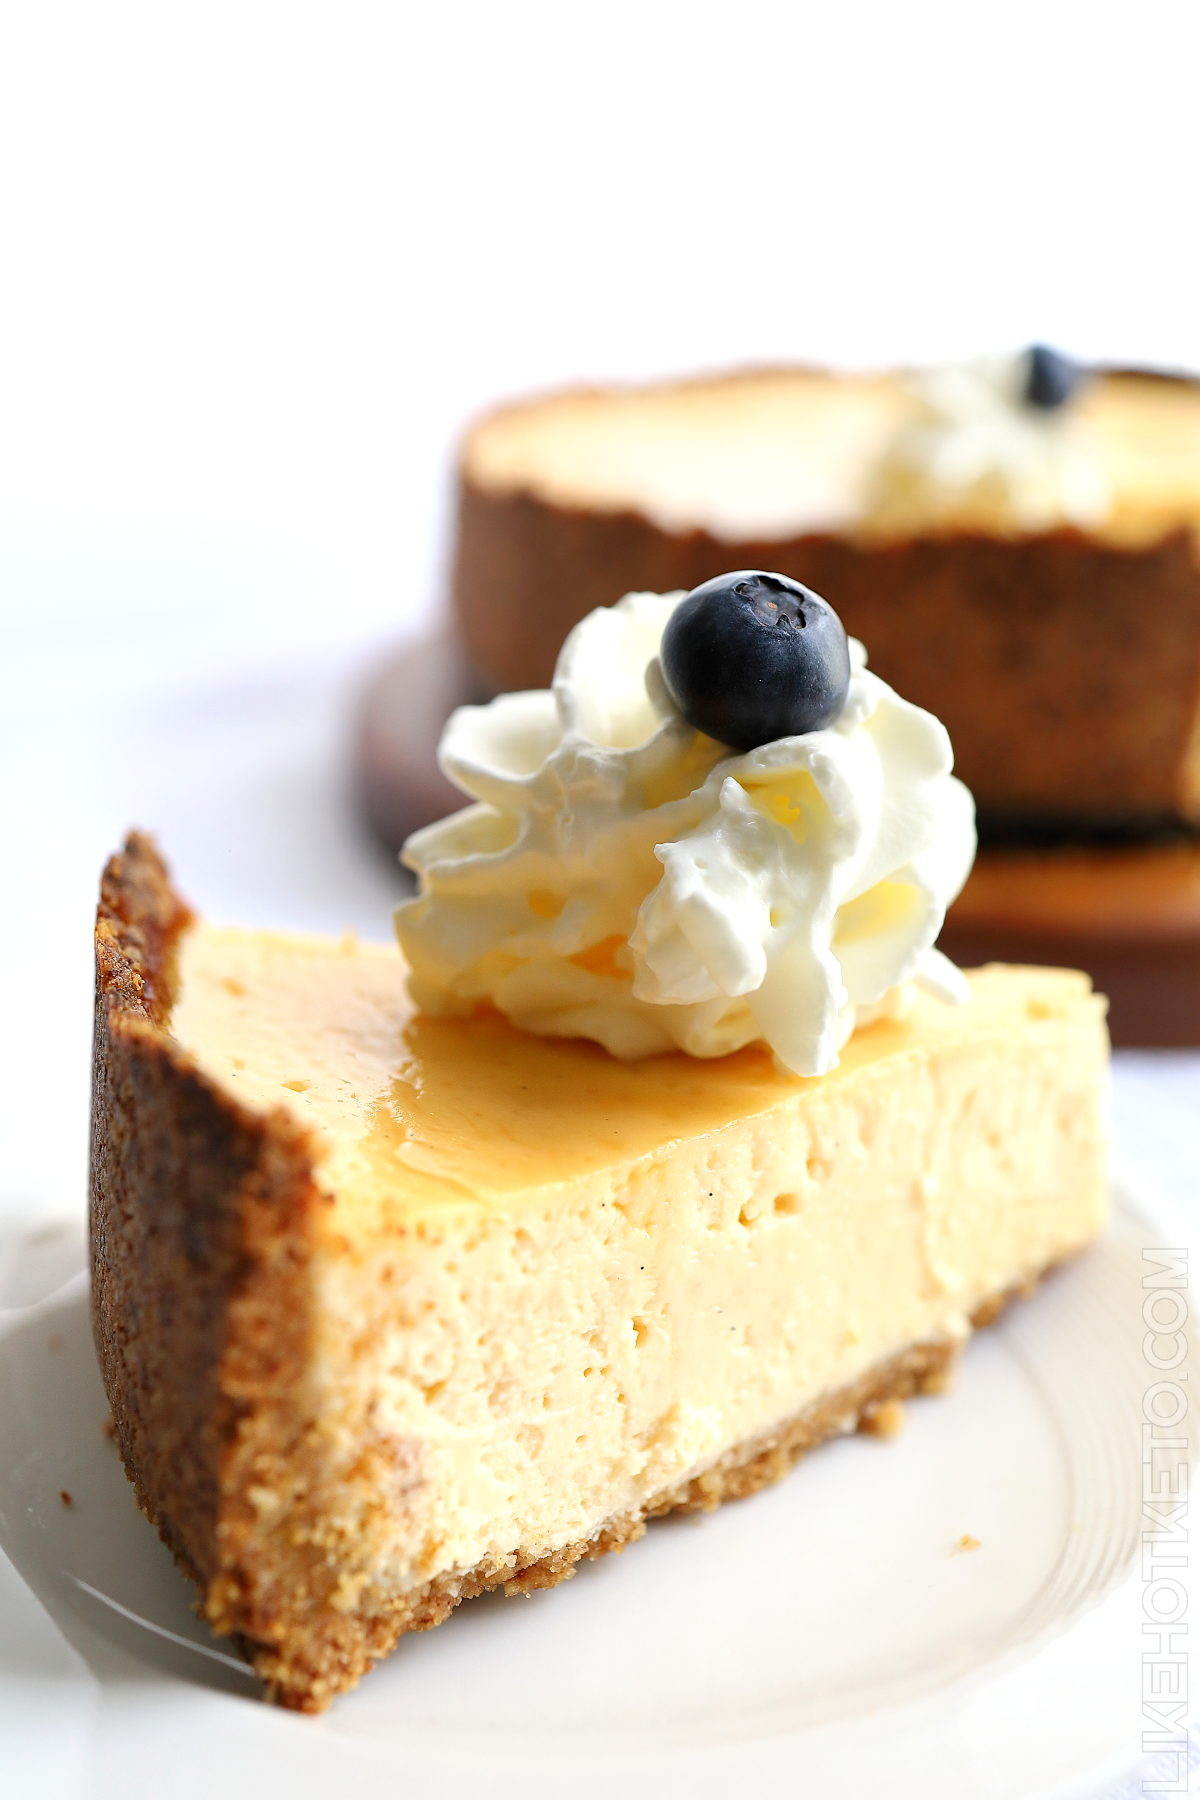
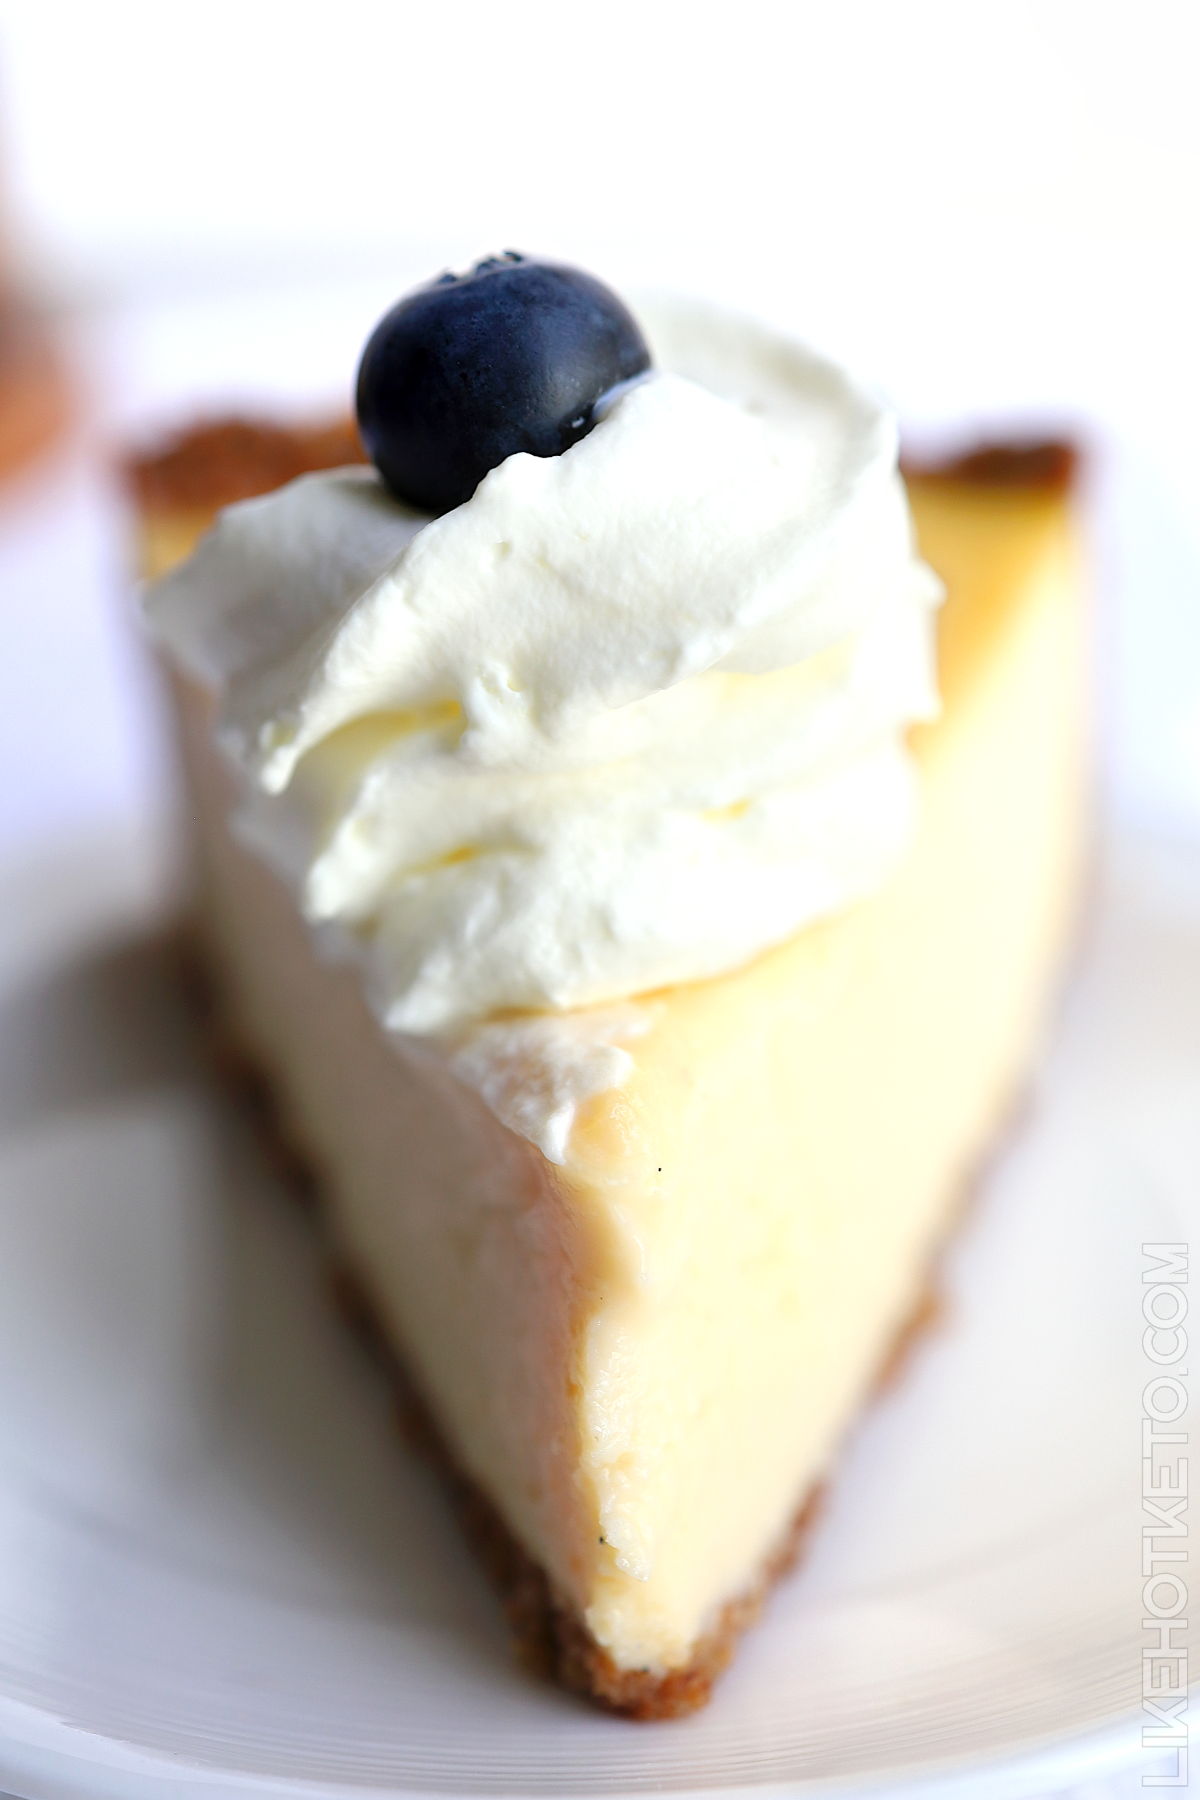
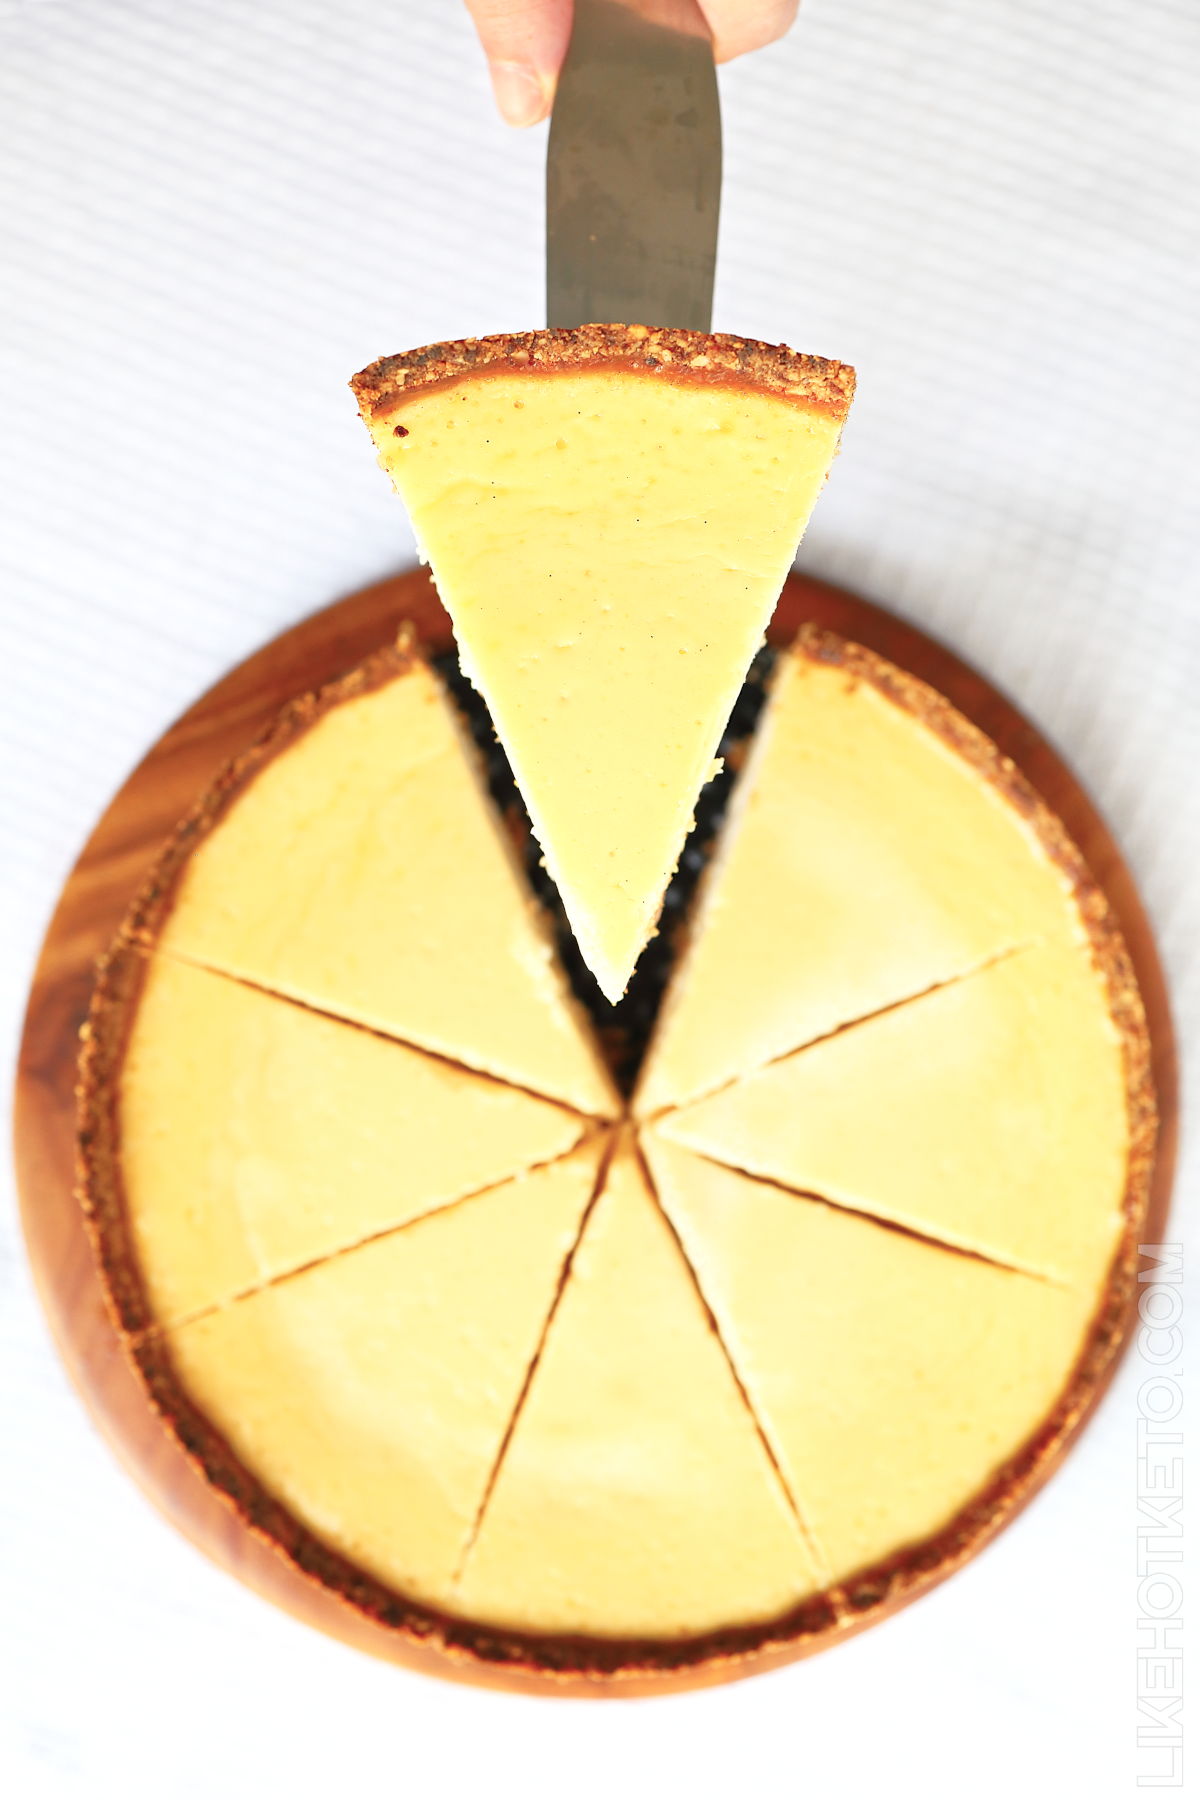
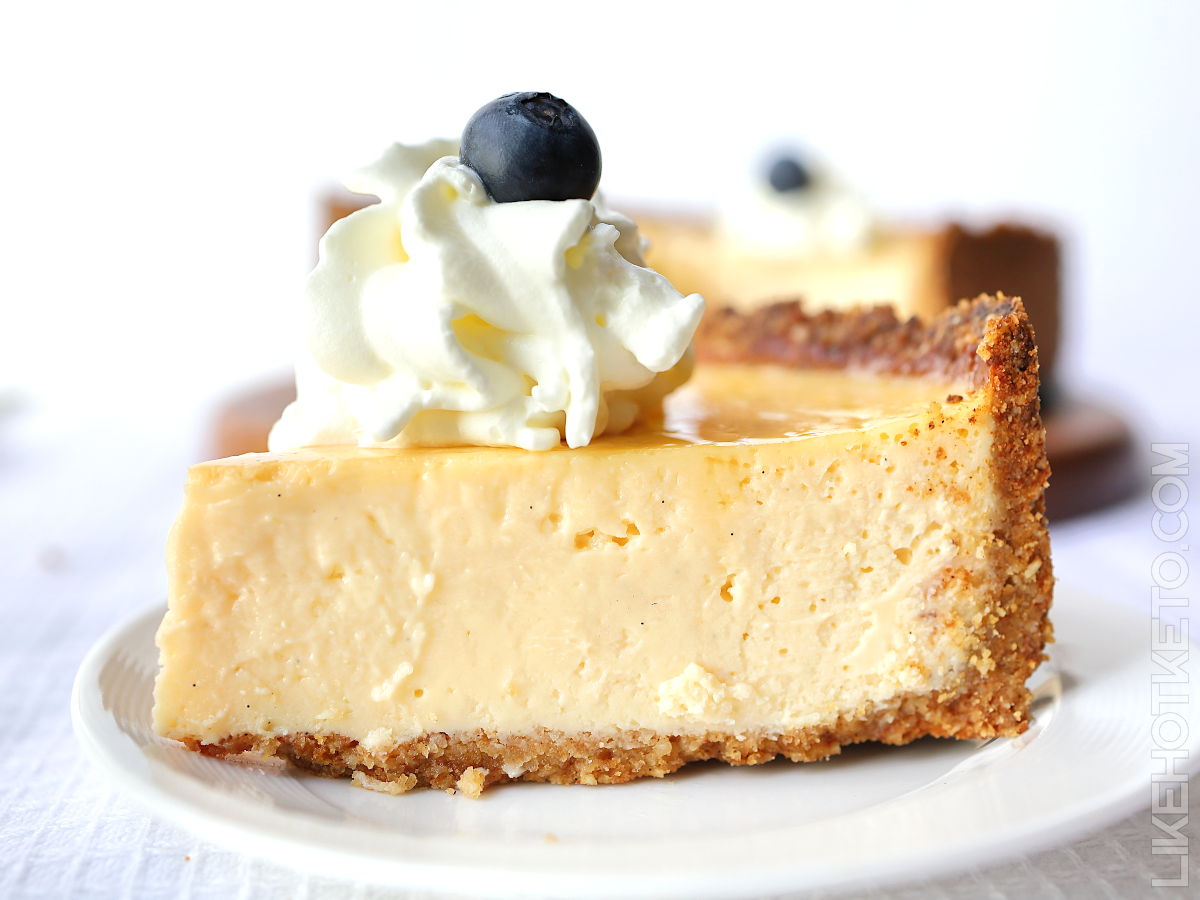
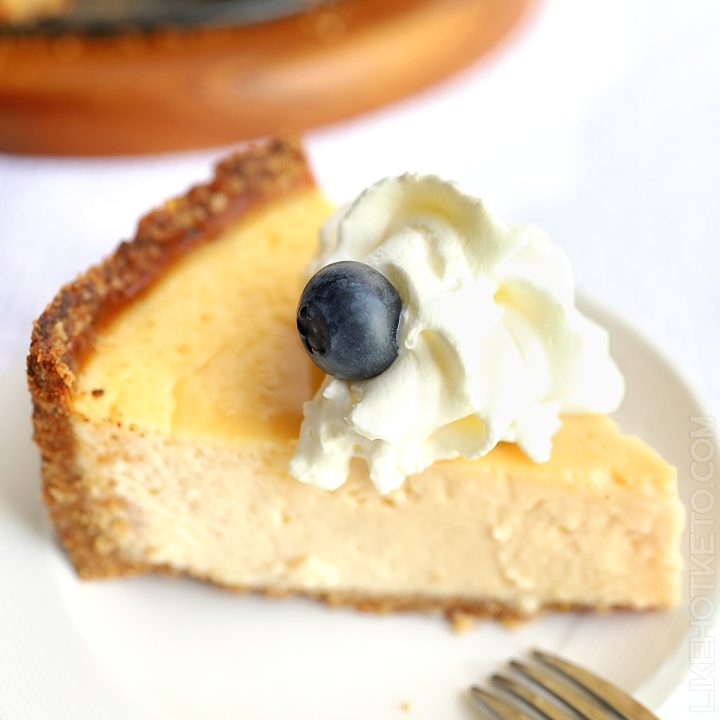
The classic silky, smooth and ultra creamy American vanilla cheesecake, now better: this recipe is low-carb, gluten-free, protein packed, and easy to bake with a smooth top (no cracks!) without water bath.
This vanilla protein cheesecake is SO amazing even crustless, but with a proper crust it goes up to a whole new level! The creamy filling and delicate tangy flavor make a perfect match to my keto honey Graham cracker crust.
On this post I’ll share lots of tips for a perfect keto cheesecake: why no-water bath baking works (for cheesecake), the right way to mix the batter to avoid air bubbles and cracks, and how to get ingredients to room temperature faster – because yeah, sometimes you just can’t wait for cheesecake.
Easier than this, just a totally no-bake keto cheesecake!
Ingredient notes
Cream cheese – I used soft, full fat cream cheese for the best flavor, and because the creamier the cream cheese the easier it is to get the batter smooth. I generally use Philadelphia, as it’s easy to find anywhere and I always know what to expect, in terms of texture.
Your cheesecake will be even thicker and richer with block cream cheese, just make sure it’s fully softened before adding it to the recipe.
Sour cream – It balances out the sweetness and makes the cheesecake texture even smoother. You can totally sub for Greek or plain natural yogurt. If you like your cheesecake with an extra tangy bite, add a little bit of lemon juice too.

Whey protein – Whey in cheesecake? Yes! Let’s enhance those macros! 💪 Here at LikeHotKeto I’ll always try to sneak extra protein everywhere. I must admit, not all recipes allow for it, but happily this cheesecake bakes even better and creamier with some whey in it. The batter is more stable and less prone to cracks.
I like to use unflavored, pure protein powder for better control on flavor and texture results. Then I know exactly how much sweetener and vanilla to add, and worry not about the other added ingredients in flavored protein powders that might change the expected outcome of the recipe.
If you are using vanilla flavored protein, you can half the amount of sweetener or even remove it entirely, as level of sweetness varies a lot from brand to brand and also if it’s a naturally sweetened protein powder (with stevia/erythritol) or if it has sucralose (these tend to be A LOT sweeter!)
Vanilla – a high quality vanilla paste which contains beans or just a scrapped bean is best, but of course you can use plain vanilla extract. If you like the flavor, that’s what matters.

If using a vanilla flavored protein powder, I still recommend adding some vanilla flavoring as most vanilla whey powders (at least the ones I tried) don’t taste as much of vanilla as they wish they did.
How to make
The first step for keto cheesecake making is: deciding to make the cheesecake. Many hours ahead. For the best, most deliciously smooth and creamy cheesecake possible, you MUST have all the ingredients softened to room temperature: the eggs, the sour cream and, specially, the cream cheese.
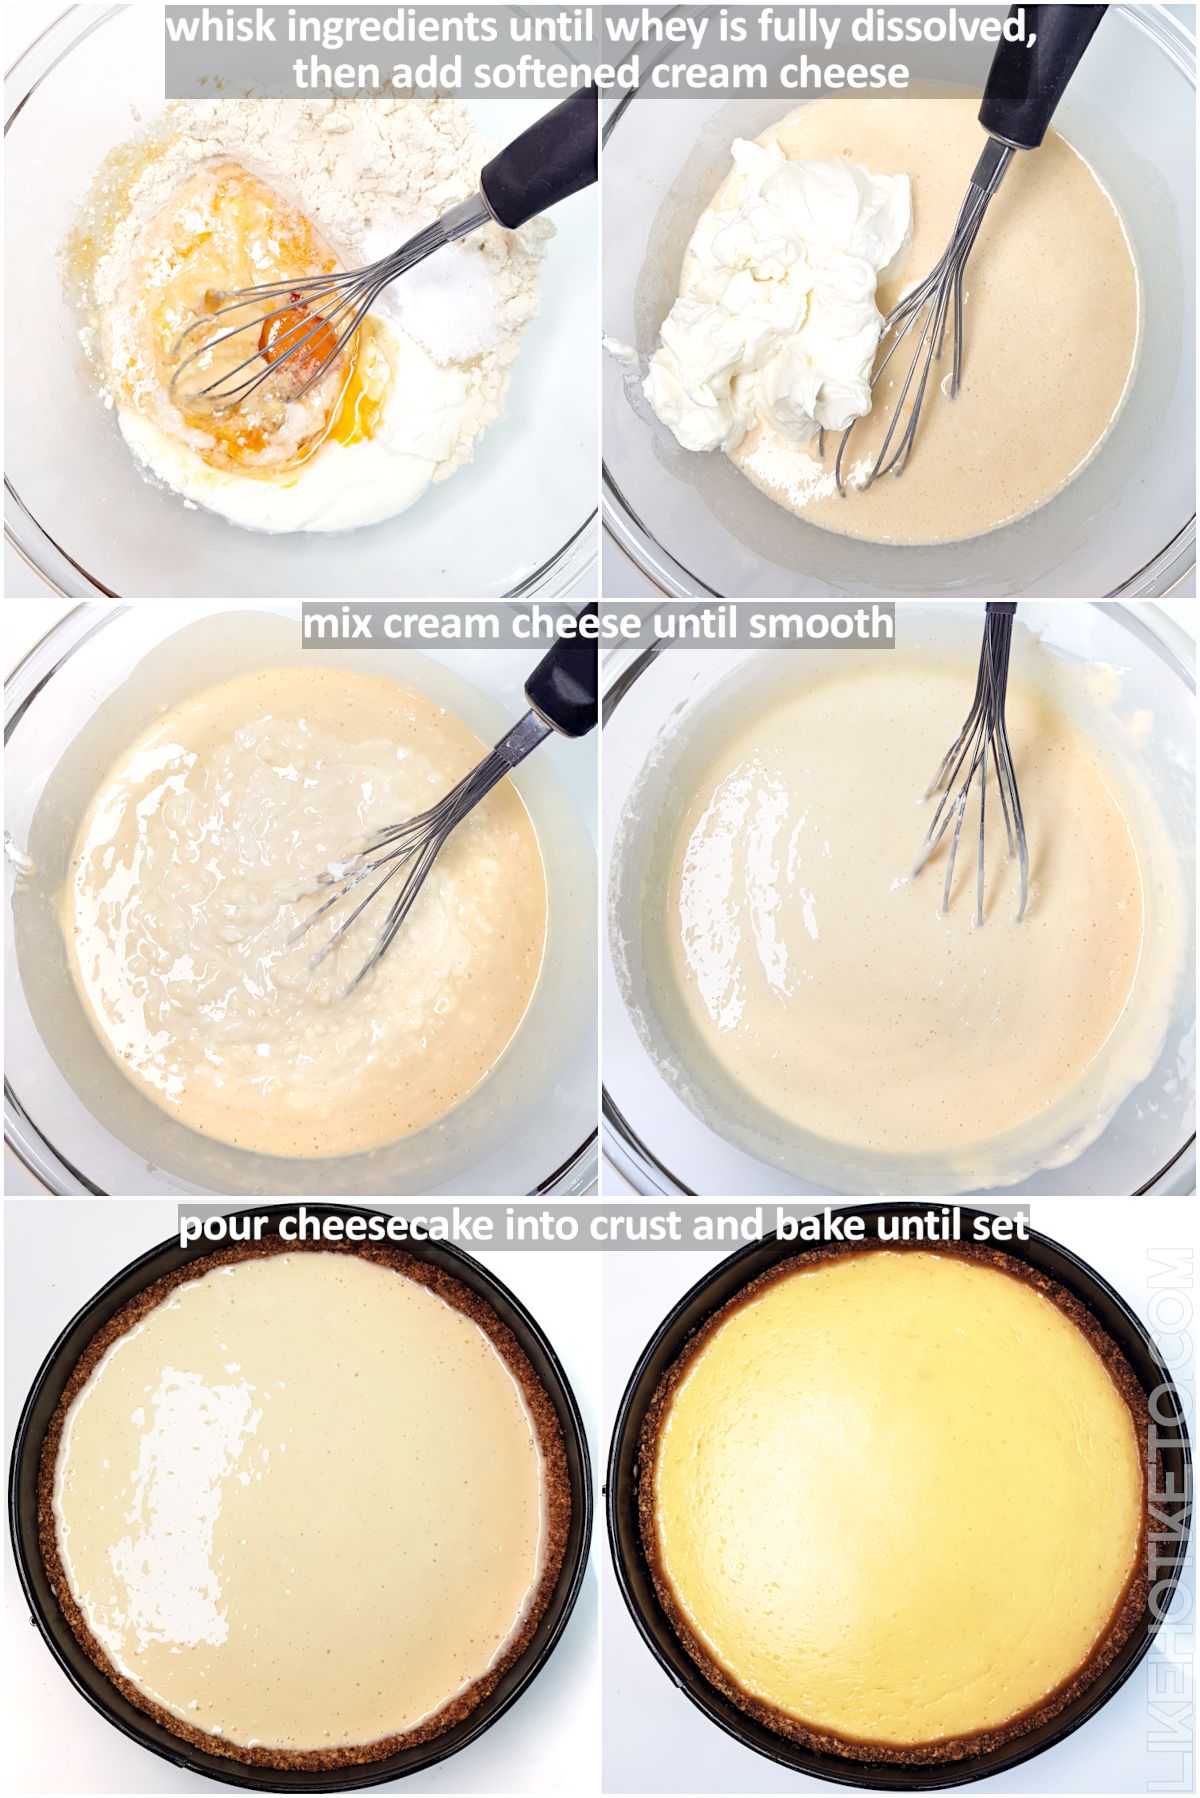
Add to a large bowl the (room temperature!) eggs and sour cream (or natural plain yogurt, or Greek yogurt), the whey protein powder, your keto sweetener of choice, and the vanilla. And, optionally, you can also add some lemon juice.
You can just whisk the ingredients by hand, there’s no need for an electric mixer. After you get the cheesecake batter really smooth and clump free, pour it over the prepared keto crust. If making a crustless cheesecake, just pour straight into a silicone pan, or a pan lined with buttered parchment paper.
Take the keto vanilla cheesecake directly into the pre-heated oven (no water bath!!🤸♀️) to bake it slowly at a low temperature for 45 minutes. When you turn off the oven, do not open the door. Keep the cheesecake inside until the oven cools down (another half an hour or so), so that it will continue cooking until then, in gentle heat.
Tips for a perfect cheesecake
How to prevent cracks
The reason why soft cream cheese is easier to work with and that you need ingredients at room temperature is that you won’t need to chase down the clumps in the cream cheese, and everything will mix pronto. You want to mix the ingredients as little as possible, as gently as possible, to avoid incorporating too many air bubbles.
Air bubbles can make your cheesecake crack as it is being baked, and that’s just a disaster. An easily fixable, purely cosmetic, first world type of disaster, but a disaster nonetheless. Few things will make a baker’s heart flutter as much as having a perfect smooth topped cheesecake coming out of the oven… Specially when you don’t use a water bath!
No water bath baking
Yes! I don’t let water anywhere near my cheesecakes anymore! I’ve had enough of the hassle and heartbreak of having recipes ruined by water seeping inside the pan. No matter how many layers of super heavy duty aluminum foil I use. Specially with some more finicky recipes (not this one!) where I spend hours in the kitchen.
This keto cheesecake is cooked gently at a lower temperature, for a slightly longer time, so you don’t need the water bath to help keep the temperature low. Also, it stays inside the oven after it has been turned off, to continue cooking slowly and to avoid sudden temperature changes which can crack the cheesecake.
Faster room temperature ingredients
Ok, say you NEED CHEESECAKE RIGHT NOW (you never know!) and you didn’t have any of the ingredients out of the fridge 4 to 6 hours ahead of time, so they’re not room temperature. My suggestion is a slight alteration to the recipe steps:
Put the sour cream and the cream cheese together in a bowl, and this bowl over a bowl with hot water, to warm them up in bain marie (i.e. double boiler). Mix the cream cheese and sour cream around as they gently warm up and soften. Then you add the whey protein, mix until clump free, add the remaining ingredients and mix until the batter is smooth.
If you keep your eggs in the fridge, you can submerge them in warm water for a while and they will come to room temperature quicker.
Lump free batter
If you still have clumps in the keto cheesecake batter after whisking for sometime, either from your cream cheese not being fully softened or because the whey protein didn’t dissolve, you can strain the batter through a mesh sieve into the pan / into the crust. This way a smooth cheesecake is guaranteed!
Storing and freezing instructions
The vanilla cheesecake will keep fresh in the fridge covered in cling wrap for 3-4 days. If you feel you’ll take longer to eat it (what’s wrong with you?? 🤨 Just kidding, congratulations!) you can freeze the slices, while still fresh.
Wrap the individual keto cheesecake slices in cling wrap or put them inside an airtight container, separated by parchment paper. They will last frozen until the zombies come and the power runs out.
Keto Classic Vanilla Protein Cheesecake
This keto and gluten-free Vanilla protein cheesecake is smooth, velvety and creamy! It's baked to perfection without water bath, and a great match to my honey Graham cracker crust!
Ingredients
Graham cracker crust (optional)
Keto vanilla protein cheesecake
- 500 grams (~2 1/4 cups) full fat cream cheese (softened to room temperature)
- 200 grams (~3/4 cups) sour cream (or natural Greek/plain yogurt)
- 3 eggs
- 90 grams (~3 scoops) unflavored whey protein powder (or vanilla whey, see Notes)
- 60 grams (~1/3 cup) keto sweetener
- 1 tablespoon vanilla paste (or 1 1/2 tablespoons vanilla extract or scrape half vanilla bean)
- 1 tablespoon lemon juice (optional)
Instructions
Graham cracker crust - optional
Prepare one batch of the keto honey Graham cracker pie crust
Keto vanilla protein cheesecake
- Pre-heat the oven to 150 °C (300 °F)
- Add the eggs, sour cream (or natural Greek or plain yogurt), vanilla, lemon juice (if using), keto sweetener and whey protein powder to a large bowl. Mix by hand with a whisk, or use an electric mixer, until the protein powder is completely dissolved.
- Add the full fat cream cheese, softened to room temperature. Whisk the cheesecake batter until completely smooth and without lumps. Don't over beat.
- Pour the cheesecake batter inside the prepared crust, or, if making it crustless, pour the cheesecake batter into a silicone pan, or line the pan with buttered parchment paper for easier serving.
- Bake the cheesecake at the pre-heated oven at 150 °C (300 °F) for 45 minutes, or until set with a slight jiggle in the center. Then, turn off the oven and leave the cheesecake inside until it's completely cool.
- Remove from the oven and refrigerate for about 6 hours (or overnight). Run a sharp knife along the edge of the pan to loosen before releasing the side/unmolding.
Notes
- Pan size used is an 8.5" by 3" tall pan, recipe will fit 8" and above pans, cheesecake will be less tall in a larger pan.
- If using vanilla flavored protein, you can half the amount of sweetener or even remove it entirely, as level of sweetness varies a lot from brand to brand and also if it's a naturally sweetened protein powder (with stevia/erythritol) or if it has sucralose (these tend to be A LOT sweeter). The vanilla taste is generally not as strong, so I still recommend adding vanilla flavoring even using vanilla whey powder.
- Nutrition Information below is for the cheesecake only. For the cheesecake plus keto honey Graham cracker crust, the nutrition per slice is: 315 calories, 26.6 grams of fat, 3.5 grams of net carbs, 1.7 grams of fiber, and 13.6 grams of protein.
Recommended Products
As an Amazon Associate and member of other affiliate programs, I earn from qualifying purchases.


Nutrition Information:
Yield: 12 Serving Size: 1Amount Per Serving: Calories: 179Total Fat: 15.5gTrans Fat: 0gNet Carbohydrates: 2.1gFiber: 0gSugar: 1.3gProtein: 10g
Nutrition information is provided as a guideline only. Different brands of ingredients may have different nutrition facts. If tracking macros, remake the calculations using the nutrition facts from the labels of the ingredients you selected. Net carbs calculated exclude carbs from insoluble fiber and sugar alcohols.
Copyright Pris Frank for LikeHotKeto. Please DO NOT SCREENSHOT OR COPY/PASTE recipes to social media or websites. We’d LOVE for you to share a link to this recipe instead 🙂 Try the easy sharing buttons below!